
Wix is a great tool for creating websites, and one of its strengths is built-in SEO. If you choose to base your website on Wix, you may not doubt that Google, Yahoo, Pinterest, and other search engines will “love” your pages at first sight.
Yet, if you wish to get complete control over the visibility of your website on Google, one possible solution is to connect it to the Google Search Console.
The platform will let you analyze loads of data about your website’s performance. You can also update your SEO settings via this Google instrument.
To make the thing work, you must create a verification file on the GSC and add it to your Wix site account. The process requires no complex undertakings, but you must do it thoroughly. In this guide.
I’ll give all the necessary instructions on how to make and insert an HTML file in the correct directory to fulfill your Wix site’s ownership verification.
Why Add an HTML Verification File?
Users have to set up an HTML verification file for the sites they own when they want to connect them to search engine platforms like the Google Search Console. Your site will be registered on the GSC after you open a Google account (if you haven’t got one yet) and prove ownership of your website. Several ways exist to confirm it, for instance, the meta tag and DNS record methods.
Yet, I recommend using the HTML file option. It has been used for ages – long before the other methods were introduced. The HTML file verification has proved to be the safest way to register on the GSC since it is kept in your website’s root directory. It won’t be visible to everyone online.
Another reason to employ this method is its simplicity. Although it may sound complicated, you do not need to install any extras or edit your website’s code to set up an HTML verification file. This way is supported on the Wix platform.
For many users with zero coding knowledge, it’ll be easier than meta tags verification, which can be run with the help of the Wix Verification Tool. HTML verification won’t affect your bandwidth outlay, either.
How to Create an HTML File for Your Website Verification?
The building of an HTML verification file is a straightforward process. You’ll need to take these simple steps:
- Sign in to your Gmail account.
- Launch the Google Search Console platform.
- Press ‘Start Now.’
- Opt for the URL prefix banner and type in your website’s URL. The GSC offers two ways to verify the ownership of a website: via the site’s domain name or through its URL. The first method will work for DNS verification only, so the URL way will suit us if we need to build an HTML verification file. When you indicate your site’s URL in the line, press ‘Continue.’
- Download the file by clicking the direct link to it.
Now, your verification file in HTML is created and ready to be uploaded from your device to your Wix website.
Steps to Add an HTML Verification File to a Wix Site
Further uploading the HTML file for verification is as easy as pie. The following actions are required:
- Enter your Wix account and go to the Dashboard.
- Go to ‘My Sites.’
- Choose the Verification section.
- Click ‘Add Verification File.’
- Pick the downloaded HTML verification file you created and click ‘Open.’
- Confirm the uploading operation by clicking on ‘Upload.’


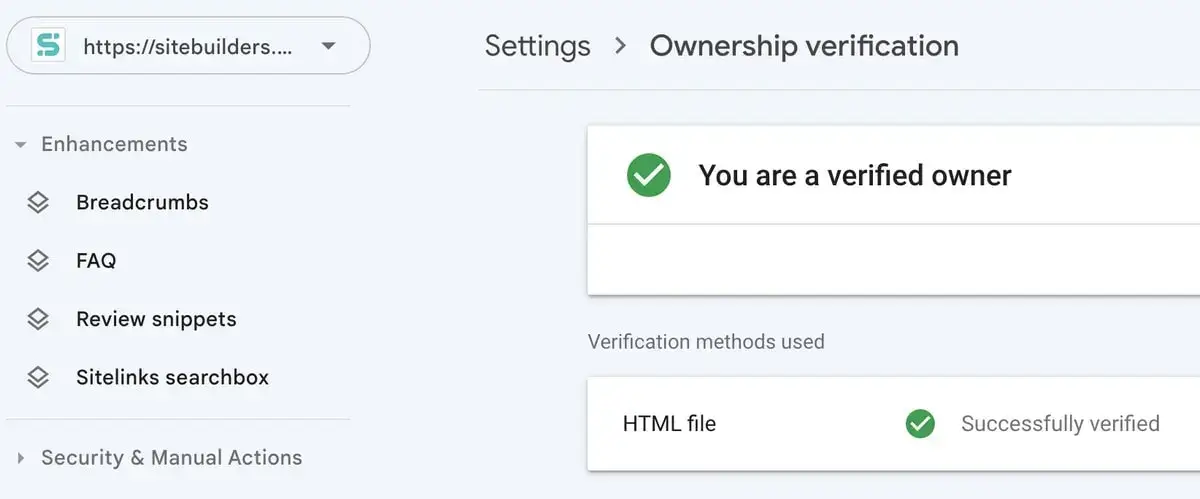
It’s done. At this point, your ownership is confirmed on the GSC, and you can access all its services.
Important Tips
While uploading the verification file, you should be careful with the folder you choose to complete the operation. The file must be sent to the root directory folder on your Wix website. This is important since the folder should not be private so that Google can access it without specific permissions.
If you insert the HTML verification file into another location, your Wix site may be inaccessible for search engine instruments. If locating the HTML file in the root directory is impossible for your website (in case you have based your Wix site on a free domain), you may do so with the HTML tag option.
HTML Tag Method
The verification of your Wix site via an HTML meta tag can be conducted with the help of the Wix Verification Tool. If you wish to get your website ownership proved by the Google Search Console, do the following actions:
- Enter your Gmail account.
- Run the Google Search Engine Console.
- Click on ‘Start Now.’
- Choose the URL prefix option and indicate your site’s URL in the corresponding line.
- Press ‘Continue.’
- Do not download anything and unfold the ‘Tag HTML’ collapsible menu.
- Copy the tag given.
- Click the ‘Confirm’ button to proceed.
Now, you must request a check of your Wix website ownership from Google. To do this and enable the work of the GSC tools with your site, it is necessary to add the meta tag to your settings.
How to Add a Verification HTML Tag to Wix
As soon as you obtain the verification meta tag, you have to save it in your Wix site’s SEO settings. You can do this in the following way:
- Log in to your Wix website.
- Go to the Dashboard.
- Open the ‘Tools and Settings’ section.
- In the ‘SEO’ section, choose ‘Site Verification.’
- Opt for the Google Search Console in the search engine list.
- Paste the HTML tag you have copied into the corresponding line.
- Tap ‘Save’ to fulfill the procedure.
After this, you should visit the Google Search Console platform again and request it to check your Wix site’s ownership. The GSC tools will scan the meta tag in your header.
Other Tips
Pay attention that the verification tags and HTML files are scanned by search engines like the GSC on a regular basis. So, you must not remove it as long as you plan to remain a verified owner of your Wix site on the platform.
Also, mind that verification tags should be written in a proper HTML format. In the case of Google, your HTML tag should have the form of .
If the tag misses an element or has an extra one, the verification won’t work. The tag generated by the Google Search Console cannot be employed to verify your Wix site’s ownership for another search engine.
Conclusion
Your ownership of a Wix website is an important step needed to connect the necessary search engines, like the Google Search Console, to it and enable their services on it. There are at least two workable ways to complete the procedure.
The easiest one is creating and adding an HTML verification file to your Wix site’s SEO settings. If this method doesn’t work, you can opt for the meta tags verification. You can find detailed instructions on how to cope with both methods in this guide.
Read also: How to Transfer a Domain from WordPress to Wix.